How to Install Road Base for a Driveway: A Step-by-Step Guide
A road base driveway installed correctly lasts 15–20 years with minimal maintenance. The same driveway installed incorrectly — skipped compaction, poor drainage, wrong depth — starts showing ruts, soft spots, and washouts within the first rainy season. The material isn’t the variable. The installation is.
This guide covers the full process from layout to final grade, written for Texas and Oklahoma conditions where expansive clay soils, intense summer heat, and seasonal downpours all work against a driveway that wasn’t built right. Whether you’re a homeowner managing a rural property project or a contractor looking for a reliable reference, each step below is what professional crews actually do — not a simplified summary of it.
Before you start, make sure you’ve calculated your material quantity. The road base calculation article on this site walks through that with worked examples and a quick reference table, so you go into this installation with the right tonnage already on order.
What You'll Need
Materials:
- Road base / flex base (quantity per your calculation)
- Geotextile fabric (woven, heavy-duty — strongly recommended in clay soil areas)
- Stakes and string line (for layout and grade reference)
- Water source for compaction moisture
Equipment:
- Skid steer, box blade tractor, or grading equipment for spreading
- Vibratory plate compactor (minimum for residential) or vibratory drum roller (better for longer driveways)
- Transit level, laser level, or string line and tape for grade checking
- Rake and hand tools for edge work and low spots
For rental: Plate compactors and vibratory rollers are available at most equipment rental yards across Texas and Oklahoma. For a single-car driveway, a plate compactor is adequate. For anything wider or longer than 100 feet, renting a walk-behind vibratory drum roller will save significant time and produce better compaction results.
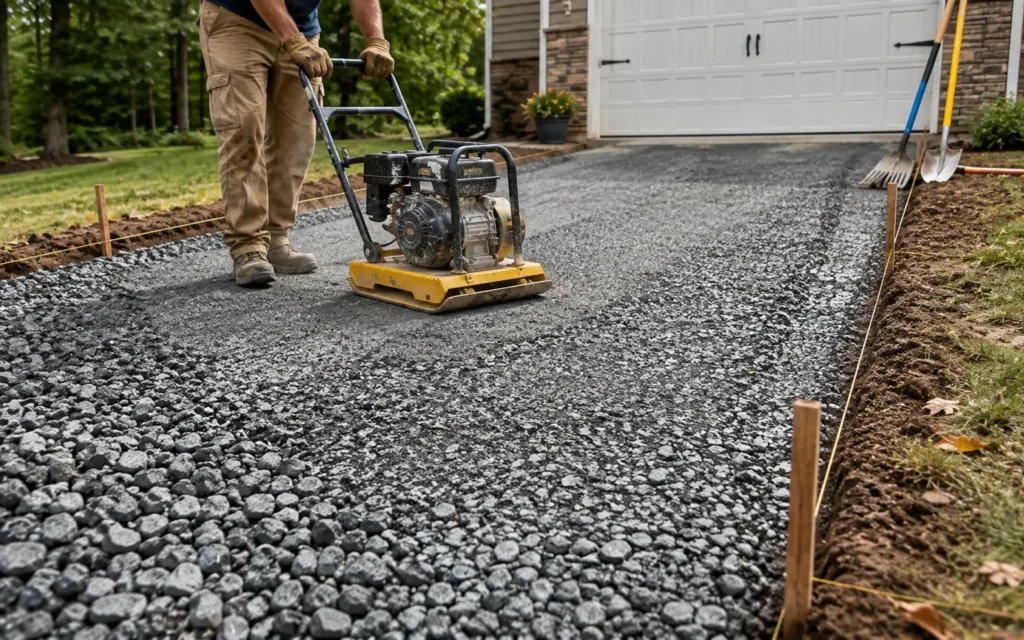
Step 1: Stake the Layout
Before any excavation, mark the full driveway footprint with stakes and string line.
Set stakes at both corners at each end of the driveway — four stakes total for a straight run, more for curves. Run string line along each edge and down the centerline. This gives you a reference for both width and grade throughout the project.
Walk the full length and note what you’re working with: where the ground slopes naturally, any low spots or drainage channels that run across the driveway path, any trees whose roots may be close to the surface, and where the driveway connects to the road or garage at each end. Problem areas are much easier to address before you’ve moved any material.
Confirm your finished width: minimum 10 feet for a single-car driveway, 18–20 feet for double-wide. If you’re building a turnaround or parking pad at the end, stake that area now too.
Step 2: Excavate to Depth
Remove existing sod, vegetation, topsoil, and any organic material from the full driveway footprint. Organic material under a base layer compresses and decomposes over time, creating soft spots and depressions in the finished surface.
How deep to excavate depends on your planned base depth plus clearance:
- 4-inch base: excavate 5–6 inches below finished grade
- 6-inch base: excavate 7–8 inches below finished grade
- 8-inch base: excavate 9–10 inches below finished grade
The extra inch or two beyond your base depth accounts for the native subgrade grade, which is rarely perfectly flat.
For Texas clay soils specifically: Black Blackland Prairie clay — common across DFW, Waco, and parts of central Texas — is one of the most problematic subgrades for driveway construction. It expands significantly when wet and contracts when dry, actively pushing up against whatever sits on top of it. When you excavate into this material, what you see is a black, sticky, almost waxy soil that smears rather than crumbles.
In these conditions, do not skip the geotextile fabric in Step 4. The clay will migrate upward through the base material over time without a separation layer, contaminating the fines and reducing compaction density. This is the primary reason road base driveways in DFW fail faster than in sandy-soil areas — not material quality, but clay migration through an unprotected base.
Step 3: Grade and Proof Roll the Subgrade
Once excavated, grade the native subgrade smooth. Remove any large rocks, root balls, or debris that would create point voids beneath the base.
Establish the drainage slope in the subgrade itself — don’t rely on the base material to correct a flat or bowl-shaped subgrade. A standard cross-slope for driveway drainage is 1–2% (about 1–2 inches of drop per 10 feet of width), sloped to one side or crowned in the middle. Water that can’t drain away from the surface finds its way beneath the base, softens the subgrade, and creates the sinking spots that appear months after installation.
The proof roll: Before placing any base material, perform a proof roll if you have access to a loaded dump truck or heavy vehicle. Drive slowly across the full excavated subgrade area. Watch for any spots where the ground flexes or “pumps” visibly under the load — a small wave or bounce in the surface as the truck passes. Any spot that pumps is soft subgrade that will create a problem. Excavate soft spots an additional 12–18 inches and replace with compacted select fill or road base before proceeding. Discovering a soft spot after the base is down and compacted means excavating the whole thing.
Step 4: Install Geotextile Fabric
Lay heavy-duty woven geotextile fabric across the full excavated subgrade before placing any base material.
Why this step matters for Texas conditions: Geotextile fabric serves two purposes. First, it prevents base material from migrating downward into soft native soil — a process called “pumping” — which reduces effective base depth over time. Second, it prevents clay from migrating upward into the base during wet cycles, which would contaminate the fines and reduce compaction density.
Installation:
- Unroll the fabric lengthwise across the driveway
- Overlap seams by a minimum of 12 inches
- Fold edges up 6–8 inches at the driveway margins to contain the base at the sides
- Secure with fabric staples or pin with steel stakes temporarily until base material holds it down
Woven geotextile (not landscape fabric) is the correct product. The woven structure provides tensile strength and prevents tearing under the weight of base material being spread and compacted. Standard landscape fabric tears too easily for this application.
If the subgrade is reasonably stable and well-drained sandy soil — common in south Texas and coastal areas — fabric is optional but still beneficial. In clay soil, it is not optional.
Step 5: Spread the First Lift
Road base compacts most effectively in lifts no thicker than 4 inches per pass. A 4-inch final compacted depth is one lift. A 6-inch depth requires two lifts. An 8-inch depth requires two lifts with the first compacted before the second is placed.
Directing the delivery: When the truck arrives, resist the temptation to have the driver dump the entire load in one pile and then push it out. This creates density variations — material pushed from a pile compacts unevenly compared to material spread progressively. Instead, have the driver tailgate-spread the material as the truck moves slowly forward along the driveway. For longer rural driveways, this means coordinating multiple trucks to spread sequentially rather than dumping in a heap at the start.
Spread the first lift to an even, loose depth of approximately 5 inches (it will compact to roughly 4 inches). Rake low spots and pull back high areas before compacting — it’s much easier to correct grade on loose material than on compacted base.
Use your string line as a depth reference. At regular intervals, check the loose depth against the string. The final compacted surface should sit at the planned finished grade, which means the loose depth needs to be slightly higher.
Step 6: Compact the First Lift
This is the most critical step in the entire installation. Inadequate compaction is the single most common cause of road base driveway failure — as the older gravel roadbase driveway article on this site notes, driveway failures within the first year are almost always a compaction problem.
Moisture and compaction: Road base reaches its maximum compaction density at a specific moisture content — called optimum moisture content. Bone-dry road base won’t compact properly; the particles can’t settle into full contact with each other. Saturated road base won’t compact either; the water acts like a lubricant that prevents interlocking. The right condition is slightly damp — the material should just hold shape when squeezed in your hand but not release water.
In dry Texas summers, the delivered material may need a light water application before compacting. Run a garden hose or water truck lightly across the surface before the first compactor pass. Don’t soak it — a light, even misting is the target.
Compactor passes:
- Make overlapping passes — each pass should overlap the previous by at least 6 inches on each side
- Work from the edges inward, then down the center, to prevent material from spreading laterally off the edges
- On a standard residential driveway, 4–6 passes with a vibratory plate compactor, or 2–3 passes with a vibratory drum roller, typically achieves adequate compaction
- After each pass set, check for visible settlement — the surface should have dropped visibly from the loose depth, typically 10–15%
- If the surface stops settling between passes, the lift is at or near maximum density
Checking compaction: Probe the compacted surface with a rebar stake or heavy screwdriver. You should not be able to push it in by hand more than 1–2 inches. If it goes in easily, the material needs more passes or more moisture before additional passes.
Step 7: Add and Compact the Second Lift (If Applicable)
For a 6-inch or 8-inch base depth, repeat Steps 5 and 6 for the second lift once the first is fully compacted.
Spread the second lift to approximately 5 inches loose depth, check grade against the string line, apply light moisture if needed, and compact with the same overlapping pass sequence.
After the second lift is compacted, the final surface should be close to your target finished grade. Minor variations of 1/4 to 1/2 inch across the driveway width are normal and acceptable.
Step 8: Check Final Grade and Drainage
Before declaring the installation complete, verify the finished surface drains correctly.
Use a string line and tape, a transit level, or a laser level to check the cross-slope across the full width of the driveway at multiple points along the length. You should have a consistent 1–2% slope (1–2 inches of drop per 10 feet of width) draining toward one side or crowning toward both edges from the centerline.
Check the connection points where the driveway meets the road at one end and the garage or turnaround at the other. Water should drain away from the garage door and not pond at the road connection.
Low spots: If you find any low spots that could hold water, add a thin top dressing of road base fines, rake smooth, and re-compact. This is much easier to fix now than after the first rain.
Edge transitions: Grade the edge of the driveway to blend smoothly with the surrounding soil or lawn. A sharp edge drop-off more than an inch or two invites edge material to migrate off laterally under vehicle loading.
Step 9: Apply a Top Dressing (Optional but Recommended)
If the road base will be the finished driving surface rather than a sub-base under asphalt or concrete, a thin top dressing of coarser clean crushed rock improves the finished surface.
The gravel roadbase driveway article recommends a 2–4 inch topping of clean crushed rock over the compacted road base. The topping provides traction, reduces dust from the fine material in the road base, and creates a cleaner appearance. Geotextile fabric between the road base and the top rock layer prevents the fines from rising through the topping during wet weather.
For a bare road base surface without topping, the fines will rise and create a dusty surface in dry weather and a slightly tacky surface in wet weather — both of which are normal for an untopped road base driveway.
Step 10: Allow Traffic and Observe
A properly compacted road base surface can accept vehicle traffic immediately. Light vehicles — cars and SUVs — can use the driveway the same day as installation. For heavy trucks, allow the base to settle for at least 24–48 hours before the first heavy load if the schedule permits.
Over the first few weeks of use, the base will continue to consolidate under vehicle weight, reaching its final density. Some very minor rut formation or wheel track impressions during this period are normal — the material is seating. If ruts deeper than 1/2 inch appear and persist after 2–3 weeks of use, the base was not adequately compacted and needs additional attention: scarify the affected area, add moisture, and re-compact.
If the road base will be topped with asphalt or concrete, allow a minimum of two weeks after installation before the paving crew arrives. Full settlement before paving prevents the slab or asphalt from cracking over settling base material.
Common Installation Mistakes to Avoid
Skipping compaction or compacting in one pass. The single most common failure cause. A plate compactor run once across loose road base does almost nothing. Multiple overlapping passes at the right moisture are what build density.
Dumping the full load in one spot. Creates a pile that gets pushed rather than spread, resulting in highly variable density across the driveway. Direct the truck driver to spread while moving.
Installing the full depth in a single lift. Material below 4 inches from the surface doesn’t get compacted by equipment running on top. For a 6-inch base, that bottom 2 inches is essentially uncompacted if you don’t use lifts. This is why deep driveways fail in the middle — the lower half never got properly compacted.
Not accounting for clay soil. In DFW and Houston clay, skipping geotextile fabric means the base will slowly lose effectiveness as clay migrates up from below and base material migrates down. Both the road base product page and this guide are explicit about clay soil performance — take it seriously.
Ignoring drainage. A flat driveway with no slope holds water. Water beneath the surface softens the subgrade. Soft subgrade leads to ruts and depressions. Every inch of cross-slope you build in during installation is maintenance you won’t have to do later.
Compacting dry material. In Texas summer conditions, delivered material can be bone dry. Compacting without moisture produces a driveway that looks good initially but hasn’t reached density — the first heavy rain softens the surface and the ruts appear.
Ordering Road Base for Driveway Installation in Texas and Oklahoma
Select Sand & Gravel delivers road base and flex base across Dallas, Fort Worth, Austin, Houston, San Antonio, and Oklahoma City. For large driveways requiring sequential deliveries while the crew spreads and compacts continuously, the dispatch team coordinates timing so trucks arrive in sequence — not all at once.
If you haven’t yet calculated your quantity, the road base driveway calculator on this site gives you worked examples for the most common driveway sizes and a quick reference table. Once you have your tonnage, the quote call takes one conversation: address, dimensions, depth, delivery window.
Frequently Asked Questions
Do I need a compactor to install road base on a driveway?
Yes — compaction is not optional. Uncompacted road base remains loose, ruts under vehicle weight, and washes out during rain. A vibratory plate compactor is the minimum for a residential driveway and is available at most equipment rental yards. For driveways longer than 100 feet or wider than 12 feet, a vibratory drum roller saves time and produces better, more consistent density.
Do I need geotextile fabric under road base?
In clay soil areas — which covers much of DFW, Waco, Houston, and central Texas — geotextile fabric is strongly recommended, not optional. It prevents clay from migrating upward into the base and prevents base material from sinking into the soft subgrade. In sandy or well-drained rocky subgrades, it’s less critical but still beneficial. It costs little relative to the base material and significantly extends driveway life.
How many lifts do I need for a 6-inch base depth?
Two. Spread and compact a first lift of approximately 5 inches loose (compacts to about 4 inches), then spread and compact a second lift of approximately 3 inches loose (compacts to about 2 inches). Road base below 4 inches from the compactor surface doesn’t receive meaningful compaction force, which is why installing the full depth in one lift produces a poorly compacted lower layer.
Should I wet the road base before compacting?
Yes, if the material is dry. Road base compacts to maximum density at an optimal moisture content — slightly damp but not saturated. In Texas summer conditions, delivered material can arrive very dry. A light, even misting before compacting improves density significantly. Don’t soak it: standing water in the surface prevents compaction just as dry material does.
How soon can I drive on road base after installation?
Light vehicles (cars, SUVs) can use the driveway immediately after compaction. For heavy trucks, allow 24–48 hours. If the road base will be topped with asphalt or concrete, wait a minimum of two weeks to allow full settlement before the paving crew arrives.
What is the proof roll and why does it matter?
A proof roll is a slow pass across the excavated subgrade with a loaded dump truck or heavy vehicle before any base material is placed. Any spot where the subgrade flexes or pumps visibly under the load is soft and needs to be excavated and replaced. Skipping the proof roll means soft spots get covered by base material, where they continue to consolidate under vehicle weight — appearing as sinking depressions in the finished driveway months later.
How do I prevent road base from washing away on a sloped driveway?
Proper cross-slope and edge containment are the primary defenses. Water moving across the surface rather than down it carries far less material. Edging — landscape timbers, concrete curbs, or steel edging — keeps base material from spreading laterally at the edges. For steeply sloped driveways, a slightly larger top rock size as a wear course over the road base helps resist surface erosion compared to a bare road base finish.
How long does a properly installed road base driveway last?
With proper compaction, adequate drainage, and appropriate base depth for the traffic load, a road base driveway typically lasts 15–20 years before needing significant regrading. Periodic top-dressing — adding a thin layer of fresh road base or crushed rock and running a compactor over it — can extend the surface well beyond that. Select Sand & Gravel can supply top-dress material for maintenance orders as well as initial installation loads.

