How to Build a Gabion Retaining Wall
Gabion walls are one of the few retaining wall systems a landowner can build without concrete, mortar, or a crew of masons — and one of the few that gets more stable, not less, as the structure settles. A gabion wall is simply a stack of wire mesh baskets filled with rock, laced together into a single gravity structure. The weight and friction of the rock fill does the retaining work; there’s no cured material to crack, no footing to pour, and no waiting period before the wall can be loaded.
That simplicity is also where most self-build failures come from. A gabion wall that isn’t planned for the soil it’s holding back, filled with the wrong rock, or built without drainage behind it can bulge, lean, or fail within a few seasons — even though every individual basket looks correctly built. This guide walks through the full process: planning, materials, rock fill selection, assembly, drainage, and the height limits where a residential project needs to become an engineered one.
What a Gabion Wall Actually Is
A gabion (from the Italian gabbione, “big cage”) is a rectangular wire mesh basket filled with rock and closed on all sides. Multiple baskets are laced together edge to edge and stacked in a stepped, battered profile to form a retaining wall. The finished structure retains soil through mass — the combined weight of the rock-filled baskets resists the lateral pressure of the earth behind it, the same basic principle as a stacked stone or concrete gravity wall, just built from modular units instead of a poured monolith.
The wire cage does three things a loose rock pile can’t: it keeps individual stones from rolling out of position under load, it holds the rock in a defined geometric shape so the wall face stays straight and stackable, and it lets the whole assembly flex slightly with minor ground movement instead of cracking. That flexibility is a real advantage over rigid concrete walls on sites with soft or shifting subgrade.
Why Choose Gabions Over Other Retaining Wall Systems
Gabion walls are typically chosen over poured concrete, segmental block, or timber retaining walls for a few practical reasons:
- No cure time. The wall is structurally functional as soon as the last basket is filled and closed — no waiting for concrete strength gain.
- Permeability. Water passes freely through the rock fill and out through the wire mesh, which removes hydrostatic pressure as a failure mode almost entirely, provided drainage behind the wall is also handled correctly.
- Tolerance for imperfect subgrade. Because the structure is flexible and segmented rather than rigid, minor settling doesn't crack the wall the way it would a poured concrete structure.
- Long service life with visible wear. Steel wire gabion baskets are typically rated for 50+ years depending on coating (galvanized or PVC-coated), and unlike concrete, deterioration is visible from the outside rather than hidden inside a structural member.
The tradeoff is footprint and labor: gabion walls need more base width than a comparable concrete wall for the same retained height, and hand-filling baskets with rock is genuinely labor-intensive at scale.
Planning Before You Build
Before ordering baskets or rock, four things need to be established:
Wall height and soil conditions. Retained height, soil type, and the presence of any surcharge load (a driveway, patio, or structure sitting on top of the retained soil) determine whether the wall can be built as a straightforward gravity structure or needs engineered reinforcement.
Foundation and base. Gabion walls need a compacted, level base — typically a compacted aggregate base course rather than bare soil, especially on anything but firm, well-drained ground. A properly compacted road base or flex base layer under the first course of baskets prevents uneven settling, which is one of the most common causes of a leaning or bulging gabion wall.
Drainage path. Water needs somewhere to go once it passes through the wall face. This means confirming the toe of the wall drains away from any structure and isn’t discharging onto a neighboring property or into a location that will just re-saturate the base.
Local permitting. Many municipalities require a permit and, above a certain height, an engineer-stamped design for any retaining wall — commonly triggered around 3 to 4 feet of retained height, though this varies by jurisdiction. Check before you build, not after.
Materials You'll Need
- Welded or woven wire mesh gabion baskets, sized to the wall design (common basket sizes run 3'×3'×3', 3'×3'×6', and similar modular dimensions)
- Rock fill sized to the basket's mesh opening
- Galvanized or PVC-coated lacing wire, or spiral binders, for closing and connecting baskets
- Non-woven geotextile filter fabric for the back of the wall
- Compacted aggregate base material for the foundation course
- Internal bracing wire (cross-ties) for baskets taller than about 1 foot, to keep the wire faces from bulging outward under fill pressure
- Basic hand tools: wire cutters, lacing tool or pliers, a level, and stakes/string line for alignment
Choosing the Right Rock Fill
Rock fill selection is the part of a gabion build most likely to be done wrong, and it matters as much as the basket assembly itself. Two things determine whether a given rock is appropriate: size relative to the mesh opening, and durability.
Size. Fill stone needs to be larger than the mesh opening so it can’t work its way out, but small enough to pack with reasonable void reduction. As a rule of thumb, stone should be roughly 1.5 to 2 times the mesh opening dimension at minimum — for a typical 3-inch to 4-inch mesh opening, that generally lands in the 4-inch to 8-inch range. Oversized stone leaves large gaps and wastes basket volume; undersized stone migrates through the mesh over time.
Durability and angularity. Fill should be hard, angular, weather-resistant stone rather than soft or rounded material. Angular stone interlocks and resists rearrangement inside the basket; rounded river rock tends to shift and settle unevenly, opening voids near the wire face. This is one reason quarried, crushed stone is preferred over natural rounded gravel for gabion fill — see the difference in how gabion-specific rock is graded compared to decorative or drainage aggregates.
Consistency. A well-sorted load with a tight size range packs more predictably than a load with a wide size spread, and produces a more uniform wall face — a meaningful consideration when the wall is visible rather than backfilled.
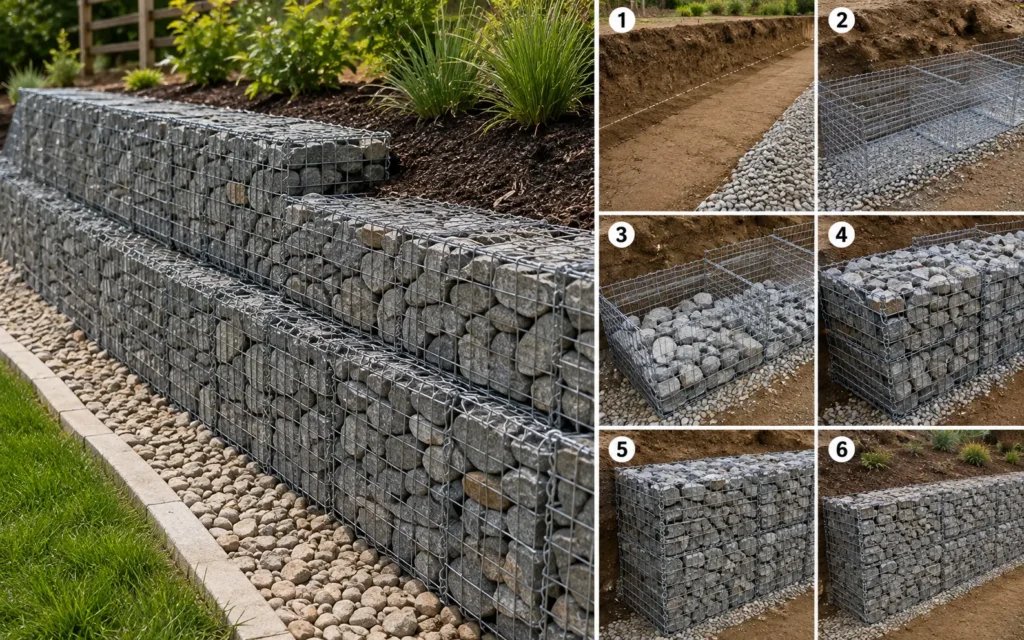
Step-by-Step Construction Process
- Excavate and prepare the base. Excavate to the design width and depth, extending several inches beyond the planned wall footprint on the front and back to give working room. Compact the subgrade, then place and compact a base course of aggregate to create a firm, level foundation. Any unevenness here telegraphs directly into the finished wall.
- Lay out and assemble the first course of baskets. Unfold and form each basket into its rectangular shape, lacing the corners and edges per the manufacturer’s spiral-binder or wire-lacing instructions. Set baskets on the prepared base, level and square to each other, and lace adjacent baskets together along their shared edges so the row acts as a single unit rather than independent boxes.
- Install cross-ties. For any basket taller than roughly 12 inches, install internal bracing wires connecting the front and back faces at regular intervals before filling. This is what keeps the wire face from bulging outward as the rock fill settles and pushes laterally — skipping this step is a common cause of a “pillowed” wall face.
- Place the filter fabric behind the wall line. Run geotextile fabric up the back (soil-side) face of the basket row, extending it beyond the top of the course and pinning it in place. This separates the retained soil from the drainage zone behind the baskets and prevents fines from migrating into the rock fill over time — functionally the same role filter fabric plays under any loose rock erosion control installation.
- Fill the baskets by hand. Place rock by hand along the wire faces first, positioning larger, flatter stones against the mesh for a tighter, more stable face, then fill the interior. Fill in lifts rather than dumping the full basket at once, checking and re-tensioning cross-ties as the fill level rises. Minimize voids as you go — a hand-packed basket outperforms a machine-dumped one for face stability.
- Close and lace the lid. Once filled slightly above the rim to account for settling, fold the lid closed and lace it to the basket walls with the same spiral binders or wire used on the corners. A poorly laced lid is a common point of long-term failure, since it’s under continuous outward pressure from the fill.
- Backfill and add drainage gravel. Behind the filter fabric, place a free-draining backfill layer rather than compacting native clay soil directly against the fabric. This gives water an easy path down and out through the base rather than building pressure behind the wall.
- Step back and repeat for each course. Each successive course is set back from the one below it (see battering, below), keyed into the layer beneath rather than stacked in a straight vertical line. Repeat the fill, tie, and close process for each course until reaching design height.
Drainage: The Real Difference Between a Wall That Lasts and One That Fails
The permeability of a gabion wall is a major advantage — but only if water is actually given a path through and out of the structure. Without proper drainage behind the wall, three things happen: hydrostatic pressure builds against the back face during heavy rain, fine soil particles migrate through the rock fill and clog the voids that were supposed to let water pass, and the wall gradually loses the permeability that made gabion construction the right choice in the first place.
The fix is the same principle used behind any loose-rock structure: a geotextile filter fabric separating native soil from the rock, and a free-draining backfill material — often a crushed, angular aggregate like crushed limestone — placed directly behind that fabric rather than compacted clay. On taller walls or sites with poor natural drainage, a perforated drain pipe at the base of the backfill zone, daylighted to a safe discharge point, adds a second line of defense against water buildup.
Battering, Setback, and Wall Height Limits
Gabion walls are almost never built with a perfectly vertical face. Each course is set back slightly from the one below — a practice called battering — which shifts the wall’s center of gravity back over its base and dramatically improves resistance to overturning.
| Retained Height | Typical Approach |
|---|---|
| Under 3 ft | Simple gravity wall, standard battering, minimal engineering |
| 3–6 ft | Increased base width and batter, drainage design review recommended |
| 6–10 ft | Engineered design typically required, may need reinforced base or terracing |
| Over 10 ft | Always engineered; often built as a terraced series of shorter walls rather than one tall wall |
A common baseline batter for a simple gravity gabion wall is roughly 1 unit of horizontal setback for every 6 units of height on the exposed face, with base width sized to roughly 50–70% of the total wall height depending on soil conditions — though these figures should be confirmed against soil bearing capacity and surcharge loads for anything beyond a low garden wall. As a general guide, once retained height exceeds about 4 feet, or the wall carries any surcharge load from a structure or driveway above it, it’s worth having an engineer confirm the base width and batter rather than relying on rule-of-thumb ratios.
Common Mistakes to Avoid
- Skipping the base course. Setting the first row of baskets directly on unprepared soil is the single most common cause of uneven settling and a wavy or leaning wall face.
- Building straight vertical faces. No batter means the wall relies entirely on fill weight and basket friction to resist overturning, with no help from geometry.
- Omitting cross-ties. Tall baskets without internal bracing wire bulge outward under fill pressure, even when the rock itself is properly sized.
- Using undersized or rounded fill rock. Stone that's too small for the mesh migrates out over time; rounded stone settles unevenly and leaves voids near the wire face.
- No drainage behind the wall. Treating a gabion wall like a solid barrier instead of a permeable one defeats its main structural advantage.
- Loose lid lacing. A lid that isn't laced as tightly and thoroughly as the rest of the basket is a slow, ongoing failure point under continuous fill pressure.
Estimating How Much Rock You'll Need
Basket fill volume follows the same core formula used for any bulk rock estimate:
Volume (cubic yards) = Length (ft) × Width (ft) × Height (ft) ÷ 27
Because hand-packed rock in a gabion basket typically settles to roughly 60–70% solid volume (the rest is void space between stones), plan on filling closer to the full basket volume rather than discounting for voids — the wire cage geometry, not the rock, defines how much material you need to order.
Example: A wall built from ten baskets, each 3 ft × 3 ft × 3 ft:
- Volume per basket: 3 × 3 × 3 ÷ 27 = 1 cubic yard
- Ten baskets: 10 cubic yards of fill rock
- At roughly 1.4–1.5 tons per cubic yard for crushed stone: approximately 14–15 tons
- Plus 10% overage for handling and hand-fit losses: approximately 15–17 tons
Order fill rock and baskets together, since mismatched delivery timing is one of the more common scheduling headaches on gabion projects — rock sitting on site without baskets to fill, or baskets standing empty waiting on a rock delivery, both slow the job down.
When to Involve an Engineer
A short garden-scale gabion wall — 2 to 3 feet, retaining a stable slope with no surcharge load — is generally a reasonable owner-build or landscaper-build project using the guidelines above. Beyond that, get an engineer involved:
- Retained height above roughly 4 feet
- Any surcharge load on top of the retained soil — a driveway, patio, structure, or parking area
- Poor or unknown soil bearing capacity, or a history of slope movement on the site
- Walls adjacent to a structure, property line, or public right-of-way
- Any site requiring a building permit for retaining wall construction (check local requirements before starting)
- Walls over 6–10 feet, which often require terracing into multiple shorter walls rather than one tall structure
A geotechnical or civil engineer familiar with local soil conditions can confirm base width, batter, drainage design, and whether the site needs a reinforced or terraced approach — a small upfront cost against the cost of rebuilding a wall that fails.
For gabion fill rock and everything else the project needs — gabion rock, compacted base material, and drainage aggregate — Select Sand & Gravel sources quarried stone across Texas and Oklahoma and coordinates delivery direct to your site. For projects where loose riprap might be a better fit than a gabion structure, the same team can also spec riprap sizing for the application. Contact the team with your wall height, site conditions, and location, and they can help confirm rock sizing and delivery volume for your build.

